


Video Instructions
All submissions accepted at RecSys 2026 for an oral presentation are required to provide a video of the full presentation of their work; papers presented only as posters do not require a video. We strongly recommend that your video match the length and content of your actual conference talk (your track chairs will communicate the length of your time slot) so that it serves as both an archive of your presentation and a backup for your conference talk. The video will be published alongside the final version of your paper in the ACM Digital Library before the event.
To submit your video, please use the following link: https://cms.acm.org/artifactSubmission/fileUpload.cfm?parent=5057500504. You will see the form depicted below.
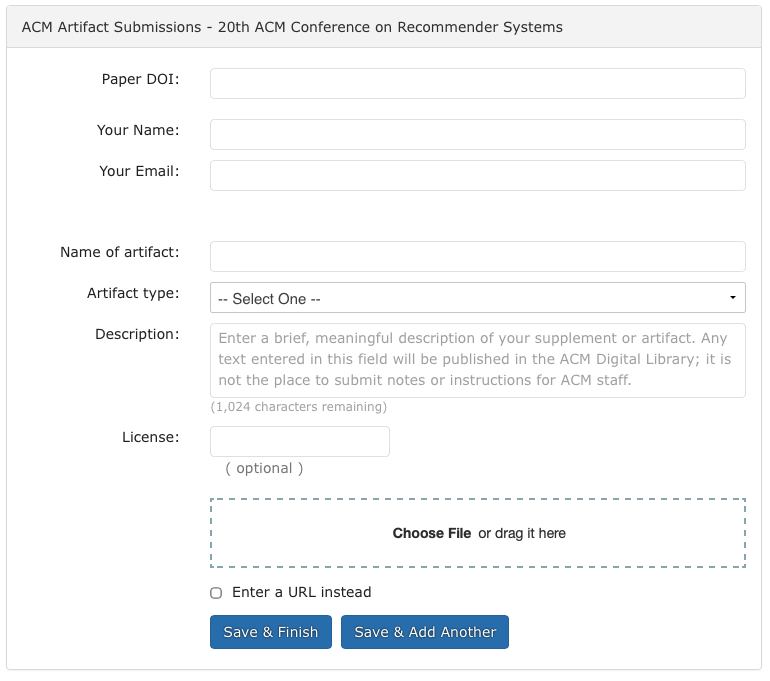
You will need your DOI, as assigned to you during the ACM rights review process, to upload this video (in the form: 10.1145/XXXXXX.XXXXXX). Do not use the “https://doi.org” part. You can find the DOI in the confirmation email from ACM rights review or at the bottom of the ACM copyright block on the first page of your PDF submission.
In the field “Artifact type”, select “Video”. You are expected to provide a very short description of your presentation video. This is limited to 1,024 characters, including spaces. If your description exceeds this character count, it will be ignored, and “Presentation Video” will be used as the default description by ACM for the Digital Library. Please be aware that, as per ACM Digital Recordings Requirements policy, all content captured is owned by ACM and may not be distributed by other means unless explicit permission is granted by ACM.
Upload your one video file, required file with captions (*.vtt), DOI, and short description to the video submission site by August 28 (23:59 AoE (Anywhere on Earth)).
Technical Requirements
When creating your video, please follow these technical requirements:
- Preferred resolution: 1080p (HD), but 720p is acceptable.
- Format: .mp4 or .m4v, optimized for streaming.
- Video codec: H.264; Audio codec: AAC+ or AAC; MPEG4 PART 10 or AVC. (See the requirements page for details.)
- Audio and video must remain in sync throughout.
- It is preferred to include a picture-in-picture window showing the presenter throughout the video.
Recording Your Video
We recommend Zoom as a fast, user-friendly option: share your slides, enable your camera for the picture-in-picture view, and record. Zoom lets you download “Shared screen with speaker view” as an .mp4 together with a “Closed caption” .vtt file in a single step. Several alternatives work equally well: presentation software such as PowerPoint or Keynote can record slides with narration, and Microsoft Teams, Loom, or OBS Studio can also produce a picture-in-picture recording. Whichever tool you use, confirm the output is .mp4 or .m4v, and re-encode if the file is oversized (for example, with HandBrake, preset “Fast 1080p30”).
Closed Captions (Required)
Every video must be accompanied by a timed caption file in .vtt format, uploaded together with your video. Captions must not be burned into the video image itself (no open captions).
Besides Zoom, authors can create captions with a free automatic captioning tool such as YouTube Studio or otter.ai. Automatic speech recognition is quick and works well for most speech. For the most accurate result, you can instead start from a written transcript of your narration and let the tool add the timings.
Please manually verify your captions before uploading. Automatically generated captions frequently misrecognize names, acronyms, formulas, dataset names, and other technical terms. Open the caption file in the tool’s caption editor or any plain-text editor and check it line by line against your narration, correcting every error before you submit.
Step-by-step: creating a .vtt caption file with YouTube Studio (free)
- Sign in to YouTube Studio with any Google account
- Click Create -> Upload videos, choose your video file, and set Visibility to Private or Unlisted
- Add the captions using either method below:
- Automatic (advised): confirm the video language is set to English; YouTube generates captions automatically a few minutes after the upload finishes.
- From a transcript (most accurate): prepare a plain-text, line-by-line transcript of your narration — mark non-speech audio in brackets, e.g. “[background music]” — and upload it; YouTube adds the timings for you
- In the left menu, open Subtitles, then select the English track to open the caption editor.
- Verify accuracy: review the captions against your narration and correct every error, paying special attention to names, acronyms, formulas, dataset names, and technical terms.
- Download the caption file in .vtt format, and upload it with your video on the submission form
Using otter.ai instead: upload your video, let it transcribe, correct any errors in the transcript, and export. The free tier exports plain text only, which you can then time-stamp into a .vtt file using the transcript method in YouTube Studio above. Whichever tool you use, always complete the verification step before uploading.
Accessibility
Design your video so every attendee can follow it, including those who are blind or have low vision, are not native English speakers, or rely on captions. A good rule of thumb: the talk should be understandable from the narration alone — if a visual matters, describe it out loud rather than saying “as you can see here.” A short (5-minute) video on creating an accessible presentation covers the essentials.
Script:
- Include all important information – don’t assume everyone can see the visuals
- Describe images and charts
- Avoid using slang and colloquialisms – use simple direct language
- Avoid pointing and saying “as you can see …” or “… here” without giving additional information verbally
- If your visuals need more description than can be included in the script, consider providing an audio-described version of the video, or give a link to a written description
Visuals:
- Remember that viewers may have captions showing on the bottom part of the screen and avoid using that area for important information
- Use a color scheme with good contrast
- Avoid small text
- Use more than just color to communicate information
- Avoid effects that can trigger adverse reactions, such as flashing lights or strobes (a seizure risk for people with photosensitive epilepsy), rapid animations, unsteady camera work, and sudden loud sounds. If such content is unavoidable, warn viewers just before it.
Audio:
- Provide a closed caption file (required) that captures the audio content of your presentation. Some RecSys attendees are not native speakers of English, and some cannot hear the audio. See information above on how to do this.
- Avoid loud sounds or repetitive alarms that could trigger an adverse reaction. If you include components such as police car sirens, warn viewers before this content so they can mute their computers.
Platinum Supporters






Silver Supporters




Bronze Supporters




Organizational Sponsors

